Friday, December 21, 2018

Ice Castles

We've got a mini crop going on over at Creative Inspiration and our theme this month is Family, Holidays, Vacations, Celebrations, Christmas with a little bling and sparkle. My challenge is to do a vacation layout. Here's mine...


This a photo of my stepchildren and grandchildren on a vacation to Ice Castles in New Hampshire earlier this year. I wanted to keep the cold icy feel so I went with a monochromatic design using only gray and white.

I hope you'll stop by Creative Inspiration and play along with us!

Thanks for stopping by!

Tuesday, December 18, 2018

Christmas Gift Tag

I've got a gift tag project up at the Dies R Us Inspiration Blog today.  I like to get messy from time to time and boy did I have fun making this tag. I love how the glass beads on here look like ice!


I started with a blank tag and applied some Tumbled Glass Distress Ink all over it.  I covered the ink with some clear gesso and sprinkled some sparkling snow glitter all over the tag. Then I applied some glass bead texture gel in random areas. While that was drying, I went to work on my die cuts.
The dies I used were Impression Obsession snowflakes and Impression Obsession Greeting Set. I cut out the snowflakes and then inked them with some more Tumbled Glass Distress Ink and added some embellishment mousse to give them a little shine. To adhere everything to the bumpy tag I used some ScraPerfect Best Glue Ever which held beautifully even on the bumpy glass beads.

Supplies Used


  Impression Obsession - Dies - Snowflakes

Impression Obsession - Dies - Greeting Set

Distress Ink Pad - Tumbled Glass

Best Glue Ever


Scraperfect - No Clog Writing Cap - Small


Thanks for stopping by!

Saturday, December 15, 2018

Ride

I've got a sketch reveal layout up at the Sketches in Thyme Blog today. We use a new sketch each week and then everyday one of the DT members reveals her take on the sketch. I hope you'll stop by and check us out.


Here's the sketch


I really liked this sketch so, as you can see, I copied it exactly. I'm looking forward to seeing what everyone else does with the sketch. 

Thanks for stopping by!

Tuesday, December 11, 2018

Christmas Poinsettia Card

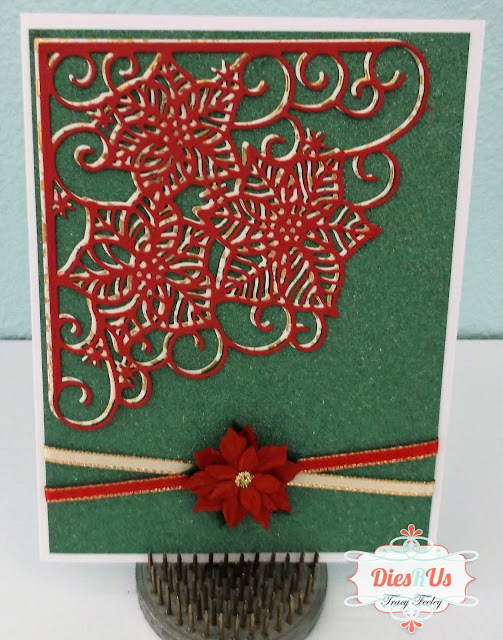
I've got a card up today over at the Dies R Us blog with another to way to use your dies. I was cutting out this poinsettia die by Tutti Designs in a couple of different types of paper and happened to lay them down on top of each other and noticed how pretty they looked together.


Here are the two separate die cuts


I then layered them but offset them just a bit so the gold would show behind the red cardstock. I thought it gave just enough sparkle behind the red cardstock. I used ScraPerfect Best Glue Ever with the small no clog writing cap to adhere them together.


I layered it on a piece of green glitter paper, added the ribbon and flower and layered it on a white card base. I just love how this card turned out!

Supplies Used:


Tutti Designs - Dies - Poinsettia Corner


Best Glue Ever


Stickles Glitter Glue - Gilded Gold


Scraperfect - No Clog Writing Cap - Small


Thanks for stopping by!

Sunday, December 9, 2018

Merry Christmas to You

It's Sunday, so that means we have a DT  layout and card sketch reveal over at Creative Inspiration.

 Here's my take on the card sketch


Here's the sketch


I had so much fun with this sketch! I swiped some Distress Oxide Ink in Wilted Violet and Broken China across some white cardstock and then stamped some small snowflakes over top of the ink. I adhered the panel to a white card base and added a stitched frame die cut on top of it. I die cut the snowflakes and inked them with some Tumbled Glass Distress Ink and added some Mother of Pearl Nuvo Embellishment Mousse to give them some shine. I added the sentiment and sequins and it was done.

Thanks for stopping by!


Sunday, December 2, 2018

Joy to the World

Here's another Christmas card! I think I've made more than I really need to send but I've been having so much fun with the October card kit from Scrapping For Less. The stamps and ephemera they included in this kit were fabulous!

Isn't this stamp just super cute!!! I couldn't wait to color it! 


This card is also for the Creative Inspiration Sunday sketch reveal. I hope you'll stop by and check out all the other DT members projects. We have a layout sketch along with the card sketch. Hope to see you there!

Thanks for stopping by!


Saturday, December 1, 2018

12 Days of Christmas

We're having a 12 Days of Christmas Crop over at Creative Inspiration. We've got a bunch of fun challenges from our Design Team and a few games. So come join us and play along. We'd love to see you there!

For my challenge I decided to make a tag


I started with a blank tag and inked it using some Tumbled Glass Distress Ink. I then used a stencil with silver stencil paste for all the stars. On the bottom of the tag I smeared some glass bead texture gel. I love how it looks like ice once it dries. I then stamped and die cut the little snowman and colored him with colored pencils and stamped the little sentiment.

Thanks for stopping by!

Tuesday, November 20, 2018

Easy Christmas Cards

Tracy here with you today and I've got a couple of quick and easy Christmas Cards. That's what I love about dies! This time of year is always hectic getting ready for the holidays so if I can make some quick and easy cards that's a win-win for me!


Each one used only one die and then I just embellished them and added some washi tape.


For the first one I started with a white card base and then added a panel of green cardstock. I embossed a piece of white cardstock using an old Darice snowfall embossing folder and layered that on top of the green piece. The Merry Christmas was cut from green cardstock using a Tutti Designs die and then I just embellished each snowflake with some Red Berry Nuvo Crystal Drops. I also added a strip of washi tape across the bottom.  To adhere the die I used some ScraPerfect Best Glue Ever with the small No Clog Writing Cap. 


For the second I again started with a white card base and added a panel of red cardstock. It doesn't show in the photo but the white panel on top of the red has a bit of sparkle in it. The  wreath die cut was cut from green cardstock using another Tutti Designs die. I then embellished the wreath with some Gilded Gold Stickles and some Red Berry Nuvo Crystal Drops, added a washi tape frame around it and stamped Christmas Wishes and the two stars in red. To adhere the die I again used some ScraPerfect Best Glue Ever with the small No Clog Writing Cap.

Products Used:


Tutti Designs - Dies - Merry Christmas

Tutti Designs - Dies - Holiday Wreath


Nuvo Crystal Drops - Gloss Red Berry


Stickles Glitter Glue - Gilded Gold


Best Glue Ever


Scraperfect - No Clog Writing Cap - Small

Don't forget to come join in the fun at the Dies R Us Challenge Blog. There's a new challenge theme offered on the 1st and 15th of each month and one lucky randomly drawn winner will receive a gift voucher prize to the Dies R Us Store. For your convenience, all the important Dies R Us links are provided below.

Thursday, November 15, 2018

Snow Day

I've got a sketch reveal up at the Sketches in Thyme blog today. We have a new sketch every week and all the DT members get to reveal their take on the sketch each day.


Here's the sketch for this week


This was a fun sketch to work with! I decided to do a winter layout and I love using pink in my winter layouts. Of course, having 2 granddaughters makes it easy since they're always dressed in pink. I started with pink cardstock and matted the photos in blue. I used some papers from the Ice Crystals collection from Craft Smith and chipboard snowman and snowflakes are Glitter Chips Frosty Memories from Tattered Angels. The little paper snowflakes are leftovers from a snowflake border punch that I always keep on hand. I use them a lot!

Thanks for stopping by!


Tuesday, November 13, 2018

Fall Greetings

I've got a card up on the Dies R Us Blog today and it's another fall card. Fall is my favorite time of year and I just go a bit overboard making fall cards every year. Here's my latest.....


I started with a piece of watercolor paper and just brushed some watercolor paint on the one side of the card and then did some paint splatters on the other side of the card. Next, I cut out my leaves using different fall colored cardstock and the Lawn Fawn Stitched Leaves dies.


I tied some jute around the panel and then played around placing the leaves on the panel. Once I liked the placement I attached them using some ScraPerfect Best Glue Ever.


Next I stamped the sentiment with some Vintage Photo Distress Oxide ink and popped that up so it would sit over the jute. 


Supplies Used:


Lawn Fawn - Stitched Leaves Dies

Distress Oxide Ink Pad - Vintage Photo

Best Glue Ever


Don't forget to come join in the fun at the Dies R Us Challenge Blog. There's a new challenge theme offered on the 1st and 15th of each month and one lucky randomly drawn winner will receive a gift voucher prize to the Dies R Us Store. For your convenience, all the important Dies R Us links are provided below.


click below for:

Thanks for stopping by!

Saturday, November 10, 2018

Merry Christmas

I've got an Anything Goes Challenge up today at Creative Inspiration. Since it's the holiday season, I've been busy working on Christmas cards so my challenge to you is to make a Christmas or Holiday card. You know you need some!


This was a quick and easy one and I made several just in different colors. I started by embossing a piece of white cardstock with my falling snow Darice embossing folder. I cut the Merry Christmas out using a Tutti Designs die and added some red Nuvo drops to the little snowflakes. I added a small strip of washi tape at the bottom, matted it with some matching green printed paper and put it all on a white card base and it was done. Easy Peasy!

Thanks for stopping by!

Thursday, November 8, 2018

Look Who Won The Game Ball!

I've got a stash challenge up over at Creative Inspiration today. My challenge is to use up your stash that is at least 5 years old. Everything on my layout is at least 5 years old, other than the photos.


I first pulled out the photos and then just started digging around in my stash to see what I had that was softball related. I was surprised at what I found! This whole layout came together rather quickly once I found all the stickers.

I hope you'll stop by Creative Inspiration and play along with us. I know you must need to use up some of your stash!

Thanks for stopping by!

Tuesday, October 23, 2018

Fabulous

I'm up today over at the Dies R Us Blog with a quick and easy card to put together. I've had this sentiment stamp for a while and couldn't figure out how to use it and then all of a sudden it clicked while going through my dies.


I started with a purple card base and layered some blue cardstock and a piece of watercolor paper that I had tried a new technique on with alcohol inks and water several months ago. I then took 2 different shades of purple cardstock and die cut the stitched frames and used some pink paper to die cut the scribble heart. I stamped and embossed the sentiment and glued everything down using some ScraPerfect glue. Of course I had to add a little bling so I grabbed some Nuvo Crystal Drops and that was it. Quick and easy!

Thanks for stopping by!

Friday, October 19, 2018

Party Time Card

We've got a Mini Crop going on over at Creative Inspiration and my challenge is to try a different background on your layout or card. I'm always searching for new techniques and found this fun and fairly easy one by Jennifer McGuire Ink that she calls Rotating Stencils.
Here's the Youtube link: https://www.youtube.com/watch?v=5f4XIaBk19I

Here's my card


I pulled out 6 different colors of my Distress Oxides and a piece of white cardstock. The stencil I used was Balzer Designs Mini Burst by TCW. I laid the stencil down and rubbed some ink over a portion and then turned the stencil slightly and rubbed the next color of ink overlapping on some of the 1st color and just continued around the cardstock with the different ink colors. I then did the same thing using some Bo Bunny Stencil Paste in whisper to add some dimension and shine. The photo doesn't do this card justice. It's much prettier in person....at least in my opinion.

I hope you'll join us over at Creative Inspiration and check out our Mini Crop challenges and play along with us.

Thanks for stopping by! 


Tuesday, October 16, 2018

Thanksgiving Card

I'm here today with my first post for Dies R Us. I am so excited to be on this amazing team. So let's get to my first project.

Fall is my favorite time of year so I had to start with a fall card using some Lawn Fawn Dies and Paper along with several Distress Oxide inks.


I started by taking a white piece of cardstock and 6 different colors of my Distress Oxide Inks and applied the inks in a random pattern overlapping them to get some beautiful fall colors. I then used that piece of cardstock to cut out the leaves for the wreath.


For the base of the wreath I used a spring sprig die from Lawn Fawn and cut that out of brown cardstock even though it doesn't show in the final result.


I then assembled the wreath with all the leaves and added a twine bow at the bottom and some orange stickles around the wreath to give it some bling. I used an old Sizzix Thinlets Mixed Media die to cut out a piece of orange cardstock and added a piece of Lawn Fawn Watercolor paper behind it. I then assembled the card on a kraft card base and since I had a few leaves left over I tucked them into the bottom left corner. I added the stamped and embossed sentiment and it was done.


Supplies Used:

Lawn Fawn - Stitched Leaves Dies

Lawn Fawn - Spring Sprig Dies

Lawn Fawn - Paper Pad - 6

Distress Oxide Ink Pad - Spiced Marmalade
Distress Oxide Ink Pad - Fossilized Amber

Distress Oxide Ink Pad - Peeled Paint
Distress Oxide Ink Pad - Fired Brick
Distress Oxide Ink Pad - Lucky Clover
Distress Oxide Ink Pad - Vintage Photo
Don't forget to come join in the fun at the Dies R Us Challenge Blog. There's a new challenge theme offered on the 1st and 15th of each month and one lucky randomly drawn winner will receive a gift voucher prize to the Dies R Us Store. For your convenience, all the important Dies R Us links are provided below.

Thanks for stopping by!