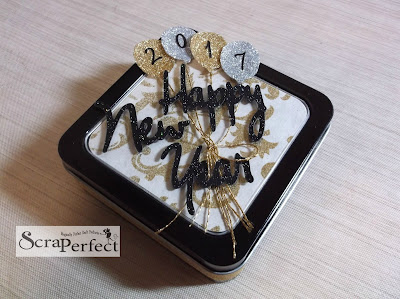
I wanted to make some sparkly balloons and what better to use than some of the Best Glue Ever.
I cut the balloons out with my Cricut and then went to town on them with the glitter.
I started by putting some of the Best Glue Ever on each balloon and then spreading it around. You can use a paint brush or sponge but I like getting messy so I used my finger.
Then I sprinkled some gold glitter on two of the balloons and some silver glitter on the other two. I tapped off the excess and then just pressed down on the glitter with my fingers to make sure it really stuck to the paper.
I let them dry and then added a light coat of the Best Glue Ever over the top of the glitter so it wouldn't flake off. I was going to put some food in the container and I didn't want to get any glitter on the food. I let it dry overnight and it was still a bit tacky but I figured that would be better than having pieces of glitter flake off onto the food.
I then took some number stickers and removed the adhesive from them using the Perfect Crafting Pouch. I just patted the back of the stickers and no more stickiness. Stickers never seem to really stick to a glittered surface and as this was a gift, I wanted to be sure they stuck. So of course I used some of the Best Glue Ever and glued each sticker to one of the glittered balloons. I took some gold string and glued it to the back of each balloon to make the balloon tails and then gathered them together and tied a bow around the tails.
I wanted to dress up the bottom of the tin but didn't have much room as this isn't a very deep tin. I found some gold sparkly ribbon and glued that around the base using the Best Glue Ever.
For the inside of the tin I cut a piece of gold and cream paper just big enough to show through the clear part of the lid. I found some black sparkly paper in my stash that was just perfect for cutting out the Happy New Year on my Cricut. Then it was time to assemble everything on the lid. I glued the balloons using more of the Best Glue Ever and then decided to pop up the sentiment which also helps keep the balloon tails in place.
Here's another look at the finished project
Thanks for stopping by!


No comments:
Post a Comment