Wednesday, May 24, 2017

A Pretty Little Purse For A Princess' Special Day

Hello Scrappy Friends! Here's a cute little purse I made for my granddaughter's 10th birthday. She's spending her birthday at Disney so I just had to go with a princess theme.


Robin's Nest Products

Other Products
Ribbon
Tissue

I started by cutting and scoring the purse with my Cricut and the Girl Crown Glittered Cardstock.


Then folded along the scored lines.


I cut the scepter out of the Gold Glitter Cardstock and Pink Grapefruit Glitter Cardstock.


I glued the two pieces together using the Best Glue Ever by ScraPerfect. This glue works exceptionally well gluing anything onto glittered cardstock. It just gets down into all the little nooks and crannies and holds so well. I also glued the dew drops onto the scepter using the Best Glue Ever by ScraPerfect along with the Embellie Gellie by ScraPerfect. The Embellie Gellie makes it so easy to place the tiny little Dew Drops in exactly the right place. 
I cut a small length of the Rosy Straw and tied and glued it around the handle of the scepter.


Again, using the Best Glue Ever by ScraPerfect, I glued the purse together. This glue makes it so easy to get everything lined up perfectly since it doesn't dry immediately. I glued the decorated scepter and additional Dew Drops to the front of the little purse, tied a couple of ribbons to the handles and filled it with tissue paper and a couple of gift cards. I just think this is so cute!


Hope you have a scrappy day and thanks for stopping by!


Tuesday, May 23, 2017

Every Beautiful Princess Deserves A Special Birthday Card

I've got a project up today over at the ScraPerfect Blog. It's a special birthday card for our little princess who's turning 10 this month. She gets to go to Disney to celebrate her special day so I just had to make it a princess theme.


I decided to break out my Color Bursts and get real  messy! The background is a mix of pink and purple color bursts on watercolor paper. Then I added some stars using a stencil and some glass bead paste. The shaker castle has been in my stash forever so it felt good to dig it out and finally use it. It was kind of plain so I added some Stickles and Nuvo Crystal Drops. The  10 was cut with my Cricut. 
What made this card come together so quickly was the Best Glue Ever.


This glue is the best for adhering things to glitter paper or rough paper. It was perfect for attaching the watercolor paper to the black glitter paper and then attaching the castle to the rough watercolor paper with the glass bead stars on it. I know if I had used my tape runner it wouldn't have held together as it has with the Best Glue Ever. I can't imagine crafting without it!


Thanks for stopping by!

Friday, May 19, 2017

How To Make Pretty Embellishments Out Of Buttons

I've got an embellishment project up today at the ScraPerfect Blog. It shows a fun way to make some pretty embellishments out of large buttons. I've had these big buttons for years and never could figure out what to do with them. They seemed so plain and boring! Then it hit me.....decorate them!


To start I wiped them clean using the Perfect Cleaning Cloth. Then I used the Best Glue Ever to add the Mica Flakes, beads and glitter to a portion of each button.


Then I dug through my stash and added flowers, lace, pearls, charms and more buttons. You can really have fun with this part and add anything you want. I think it would be fun to make several in one theme, like Christmas or Halloween.  Anyway, these were really easy to make using the Best Glue Ever. Since it adheres to everything, I didn't have to use a different glue for the metal or pearls. The Best Glue Ever held it all and the No Clog Writing Tip made it so easy to use just a tiny bit of the glue.

So now I have some pretty embellishments that I can use on some future layouts.


Thanks for stopping by!

Monday, May 15, 2017

Beautiful

I'm so excited as this is my first post for the Sketches In Thyme blog. I love their sketches and really enjoyed working with the sketch for this week.


And here's the sketch


I love the simplicity of this sketch. I don't usually do layouts with this much white space but I have to admit I really like it. It just brings the photo right into focus.

Please come join us and play along! Hope to see you there!

Thanks for stopping by!

Thursday, May 11, 2017

How To Get The Most Out Of Using Your Scraps

Hi all! I have a layout up at The Robin's Nest Blog that was made using up scraps of some of my favorite Robin's Nest papers. They were all different weird sizes so I decided to cut different size triangles out of them.


Robins Nest Products Used

ScraPerfect Products Used

I started with a green piece of cardstock for the background and added some dimension in a couple of places using modeling paste and a stencil.


I then took my scraps of Pink Glittered Leopard CardstockRosy Chevron Cardstock (reverse side)Rosy Diamond Cardstock (reverse side) and Spring Stripe Glitter Cardstock and cut different sizes of triangles using my Cricut. 


I matted the photo with some white cardstock and placed that on top of my triangles.


Decided it needed some more triangles so cut some smaller ones and randomly placed them around.


I used some wood veneer for the title and covered it using some ScraPerfect products. I coated the wood with some of the Best Glue Ever let it dry and get tacky and then laid the Transfer Foils on top and burnished with my finger. Pulled it off and the foil had transferred to the wood. I also took some pink gelatos and ran them across some areas of the modeling paste just to give it some more definition.


Next, I had some bright pink wood veneer butterflies that needed a little dressing up and what better way than to add some Diamond Dew Drops. The easiest way to do this is with some more of the Best Glue Ever with the No Clog Writing Tip attached. I also used the Embellie Gellie  for exact placement of the Diamond Dew Drops.


For the final parts I added some of the Butterfly Dew Drops along with one of the Glitter Word Titles and Rosy Cards.


See what you can do with some of your scraps!
Thanks for stopping by!

Saturday, May 6, 2017

Mother's Day Card

It's National Scrapbook Day and we're celebrating with a mini crop at Creative Inspiration . I've got a challenge in the mini crop where you have to use some twine, ribbon or string on your project. I decided to make a Mother's Day card for my stepdaughter and decided to add some twine.


I used several different techniques on this card. The flowers were done using a stencil and ink and then embossed with clear embossing powder to make them shiny. I then used a different stencil and modeling paste for the design on the left side. Once the paste dried I applied some metallic gelatos using my finger to add a touch of color. Then I just stamped the sentiment, embossed it and added the butterfly and twine.

I hope you'll stop by Creative Inspiration and join in our NSD celebration. There are lots of fun challenges and even some games and prizes. You have until Sunday May 14th to enter one or all of the challenges.

Thanks for stopping by! 

Friday, May 5, 2017

Cactus Garden

I've got a challenge up today at Creative Inspiration. It's our Friday Inspiration and I decided to use a mood board of pinks and greens for this challenge.


And here's the mood board


I hope that you will stop by and join us. We have lots of fun challenges going on and we'd love to have you play along with us.

Happy Scrapping Everyone!

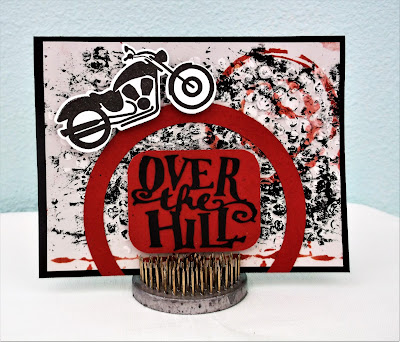
How To Make A Grungy Masculine Card With ScraPerfect

I've got a post up on the ScraPerfect Blog today on how to make a messy, grungy, masculine card. I had so much fun getting messy with this one. This card is for my baby brother who is turning the big 50 this year.


ScraPerfect Products Used

To start I used a stencil and some modeling paste to prepare the background of the card and let that dry.


Once dry I applied a very thin layer of the Best Glue Ever using a sponge brush. I let some of the glue seep between the raised surfaces as I wanted to make this look really grungy.


I waited until the glue was tacky and then laid one of the Transfer Foils on top and burnished it with my finger. I didn't want to cover everything with the foil so I just did it randomly. This is how it came out.


Since it was still a little tacky where I hadn't used any of the Transfer Foils, I took the Perfect Crafting Pouch and tapped it all over the top. 


Then  I used the Perfect Cleaning Cloth to clean up all the powder left from the pouch. Here's a photo that shows one side before using the Perfect Cleaning Cloth  and the other side after.


I then used a stencil and some red ink to add the circles in the right top corner and lines along the bottom edge. I die cut everything else using my Cricut and Cuttlebug and then assembled it all on a black base. 


Thanks for stopping by!